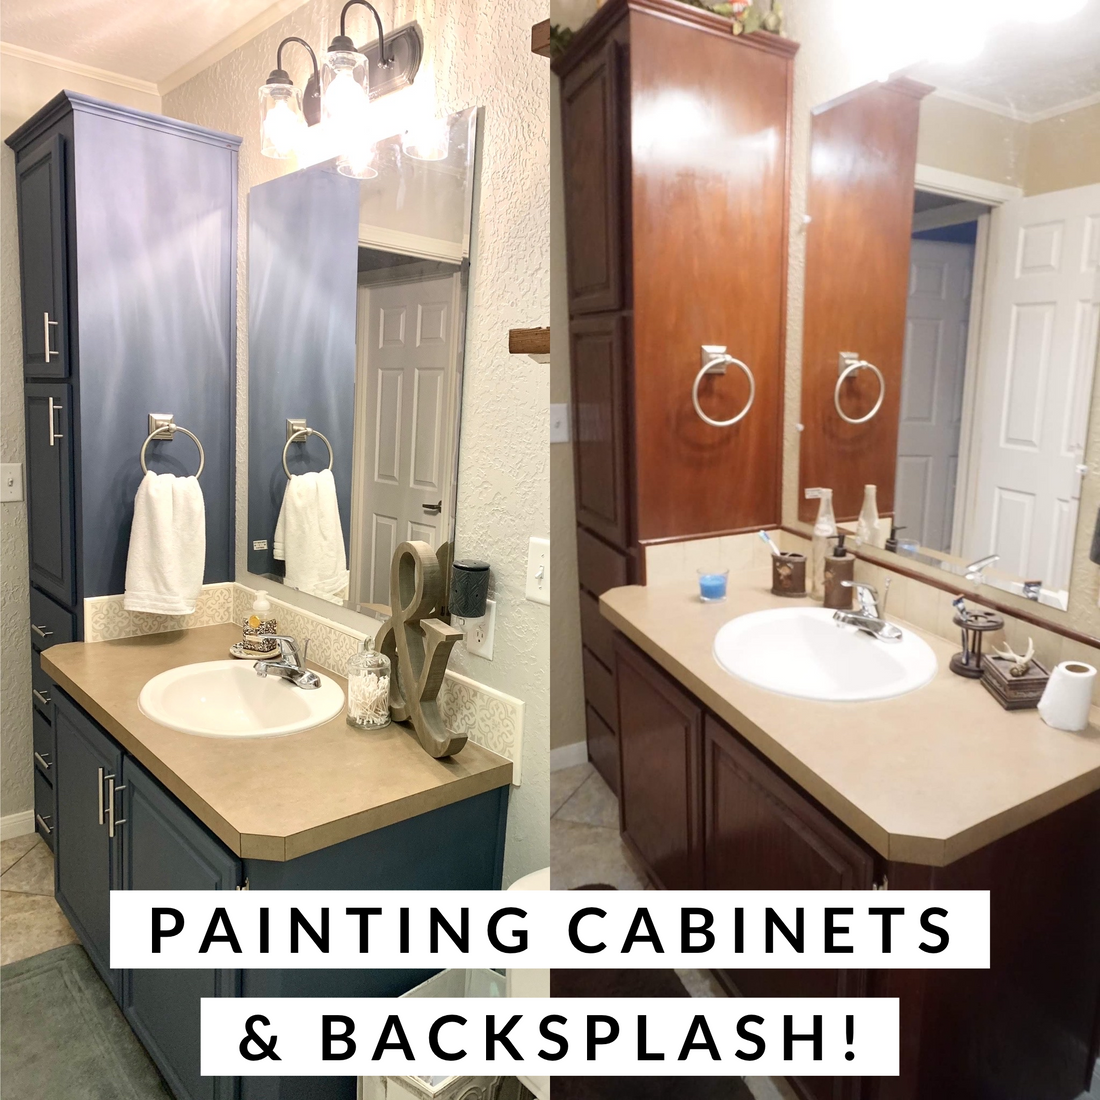
So this past month I decided to jump into painting my bathroom cabinets, and then I got a wild hair to paint my backsplash! Yep- you read that right...I painted my backsplash. And it looks so much better!

You can watch the full video tutorial here: https://youtu.be/woeBcXIz6uw

Here’s what I did…
My bathroom was just brown, tan, or BROWN…ugh I was so tired of looking at all harsh brown tones mixed together. So, over a year ago I started updating the décor and painting the walls (Sherwin Williams- Agreeable Grey).
But I decided it was time to finally complete the bathroom by updating the cabinets and countertops. Let’s DO THIS!

I loved this picture I had seen on Pinterest and had it stuck in my brain for years. So, I finally found a color mix of Annie Sloan’s Paint that worked perfect; Oxford Navy and French Linen, about a 40:60 mix.

To make sure it looked okay in the bathroom lighting, I painted the mixed color on a piece of board and held it around the bathroom where the paint would be. Once the color was just right, I made a larger batch of the mixture. When you mix, make sure you are mixing enough to cover everything plus some extra for any future touchups.

I cleaned my cabinets with warm water and dawn dish soap, I didn’t use TSP to strip any grease- however, if you are doing your kitchen cabinets or your cabinets are pretty old with lots of grime you need to use TSP first, THEN clean with water and soap. Since our spare bath was rarely used, I went with a quick wipe down.

After cleaning, I then removed the doors and drawers while also creating a number map of where everything went. This is important, some times hinges and doors can hang funny when they aren’t placed back in their original spots. Blue tape with a sharpie and a quick drawing of a map makes this easy to do!

Once, everything was removed I got to painting! I used Annie Solan’s Small Round Paint Brush and painted in up and down motions with the wood grain.

I did tape off around the edges. I also taped on the inside of the cabinets just to make for a smooth professional finish- that’s totally optional.

I painted the cabinet doors and drawers in my kitchen, it just made for more room and was easier to move around. Plus Hayes, my son, woke up and his little grabby fingers couldn’t reach LOL!

After the first coat was dry, I went right in with my second coat. Chalk Paint by Annie Sloan does not take very long to dry, so you don’t usually have to wait a long time in between coats- this makes for an easier and less time-consuming project!
When the second coat was done (and Hayes was in bed) I started sealing the cabinets in Clear Chalk Paint Wax. I LOVE WAX YALL. It is so durable and easy to spot treat!

I used my Annie Sloan Small Wax Brush to apply the wax, working it into the paint then I used a lint free Scotts Shop towel to wipe off any excess wax that may be sitting on the surface- this helps for a quicker cure time. Typically your wax will start curing within 2 hours up to 5 days depending on the humidity and temperature. I love to wax in warmer temperatures (75+) it goes on like butter!
Annie Sloan’s instructions are to give your pieces a couple of days to cure and set up before using & abusing them. I made sure we were gentle with them when attaching the doors and drawers back on. But also- I have a 1 year old BUSY BOY who is anything but graceful and gentle LOL so if you’re curious how they are holding up right after painting- awesome would be the word. Not a scratch or scuff yet!

To save a little money, I decided to hold off on completely replacing the countertops and opted for a contact paper solution (which didn’t pan out). The paper was just too stark white and modern for my style. It was also a super pain to apply, I got frustrated after 45 minutes of trying!
I painted the backsplash in Original, Chalk Paint by Annie Sloan, and a 6:1 mix of Original and French Linen.
I first cleaned the backsplash and wiped off any residue. Then I taped off around the top sides, and on the countertop to avoid getting paint everywhere.

I used my Annie Sloan Foam Roller and applied a thinner first coat to ensure the paint stuck to the tile properly. I waited longer than usual for the paint to really dry and adhere- about 30-45 minutes between coats. I also used a small detail brush to get into the corner and edges.
After my first coat was dried, I applied my second coat a little heavier than the first. Same for the 3rd coat.

Once the paint was dried, I sealed the backsplash in Glossy Lacquer by Annie Sloan. I applied it with my Large Flat Brush. Two thin coats is all it requires with proper dry time between each coat.

Since the marble contact paper didn’t work out on the countertop, I wanted to break up the solid colors by adding a stencil pattern to the backsplash. I made two stencils to fit my tiles with my Silhouette cutter (tons of tutorials out there on how to make stencils).
I mixed Original and French Linen, 6:1 ratio, for a very light grey tone. Once I got my stencils placed, I rolled on a very thin coat of paint with my AS Foam Roller. I did about 2 coats and then peeled the stencil off and went to the next tile! It dried quickly so this whole process didn’t take long!

The hardest part was getting in the corner, so I cut the stencil to fit and did the same steps as above. However, I couldn’t get all the way to the corner with the AS Foam Roller so I used a small detail brush and painted it in.
Once everything sat and dried for a while (45 min+) I applied one more coat of Glossy Lacquer and called it good.

I absolutely LOVE how the backsplash turned out. It looks so much better and actually the counter top doesn’t look as bad as before- but it’s still getting a makeover at a later date.
There are a few more small projects to do to the bathroom, updating lighting, wood frame around the mirror, and the countertop. But overall, when you compare it to the before pictures, I’m super happy with the outcome.


I took 5 hours (plus snacks, dinner time, and bed in between) to complete the cabinets, then maybe an hour (with Hayes awake and waiting on paint to dry) to paint the backsplash. Well worth the time and effort!
Let me know what you think of this DIY and don’t forget to subscribe to our YouTube channel, we are planning to continue our videos so all feedback is welcomed!
Products Used:
- Oxford Navy Chalk Paint
- French Linen Chalk Paint
- Original Chalk Paint
- Clear Chalk Paint Wax
- Small Round Paint Brush
- Small Wax Brush
- Large Flat Brush
- Lint Free Cloths by Scott
- Blue Tape
- Custom cut stencil with my silhouette
- Glossy Lacquer by Annie Sloan
- Small Foam Roller
- Mixmat
- Detail Brushes
- Mixing Paint Bucket
1 comment
It looks beautiful! We just moved into my husband’s home farm where he grew up and the bathroom is in great shape but very outdated. Do you think I could chalk paint the tile in there? I wasn’t sure about the area around the tub.