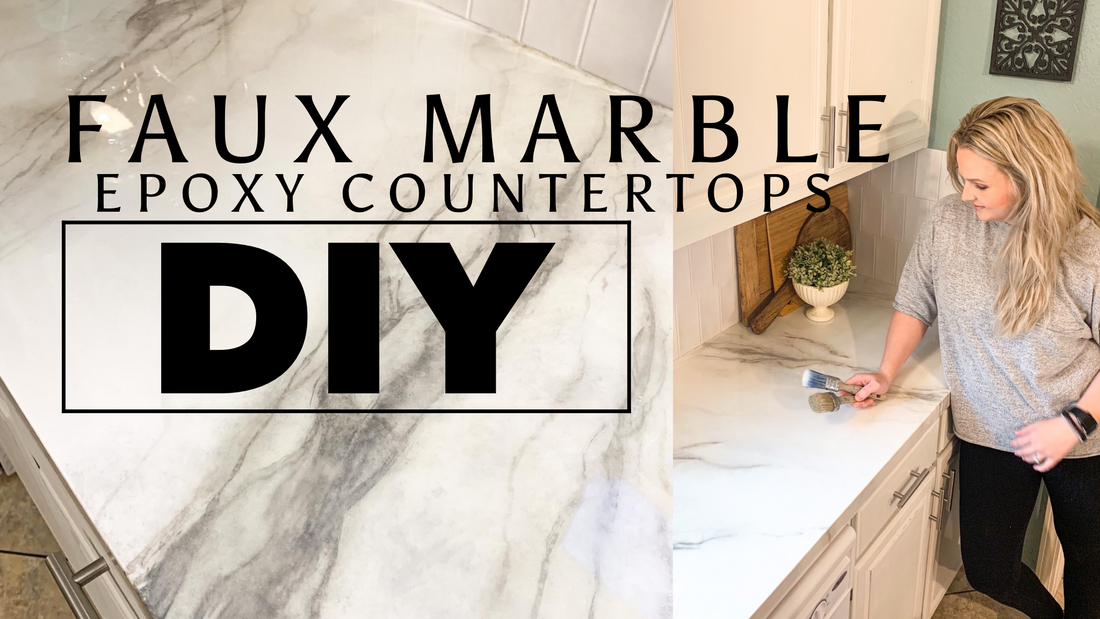
YouTube tutorial for this blog linked here.
So before I go too in depth with how I painted my Formica countertops, I want to explain why.

We live in a Solitaire double wide trailer house, everything that was designed in this house cosmetically was either tan, brown, or dull. Not my style at all! I love our house; we are raising our family here on the farm and it fits what we need perfectly. However, I wanted to make it my own. Add my own personality and charm into the house AKA make this house a home!

I had started updating our kitchen back in February of 2021, I was 32ish weeks pregnant with our daughter. I wanted to start updating but not overwhelm myself with our large, tons of cabinets, kitchen. So I did our cabinets in sections and I did the same with the other cosmetic updates, one section/project at a time.
Check out our Instagram Highlights for details on our other kitchen projects!

I finally got around to finishing our cabinetry in August, then I started working on the other projects in the kitchen which led me to the countertops 😉 Buying all new countertops was just not an option for me with two kids under two. Plus, I want to eventually update our island to a single level counter (it’s a peninsula right now) and doing all that while raising two small babies was not the best timing.
So, I researched A LOT about painting countertops; a cheaper route to updating countertops without forking out big $$$$ and having to go through a bunch of construction too.
I came across several epoxy countertop companies with YouTube videos by other home owners, and that’s where the endless research came in. I searched tons of videos, blogs, reviews over the companies, and even some social media influencers (DIYers) that had done epoxy also.
I felt pretty confident that epoxy was the way to go!
I’m going to note: I also tried the contact paper option in our spare bathroom when I updated it (see my YouTube video for that) and the paper was SO HARD to lay down around our sink and keep from sticking to itself or creasing badly. So, I omitted that option quickly from our kitchen list.
Ok so let’s get started…
For prepping the countertops, you will need:
- Rough Surface Green Tape (2) (highly recommend this one over the blue)
- Razor Blade
- Scraper or 5-in-1 Tool
- 80 Grit or finer sanding pad (here’s the one I used)
- Countertop Cleaner or something with a degreaser in it. I used Mr. Clean Countertop Cleaner
- Water/Vinegar in Spray Bottle (cleaning)
- Heavy Drop Plastic for the floor
- Regular Drop Plastic for covering cabinets and appliances.
- Brown paper roll
For Painting the countertops, you will need (if same marble as mine):
- Old White Chalk Paint (Liter size)
- Chicago Grey Chalk Paint (Sample Size)
- French Linen Chalk Paint (Sample Size)
- Country Grey Chalk Paint (Sample Size)
- Graphite Chalk Paint (Sample Size)
- Glossy Lacquer
- Large Foam Roller & Roller Refills
- Foam Brush or Synthetic Bristle Detail Brush
- Annie Sloan’s Reusable Sanding Pad (fine grit)
- Tack Cloths (2-3)
- Synthetic Fine point detail brush
- 2-3 Angle brushes
- Faux Finish Sponge
- Turkey Feather or Regular Feather
- Lint Free Shop Towels
- 3 Plastic Cups or Mixing Buckets (needs to be large enough to fit your sponge into)
- Spray Bottle (water)
- Rag for cleaning up if needed.
- Practice board of some sort to try out your veining technique
Start by prepping your countertops and appliances. Remove your stove, sink, etc if able or needed. I just taped around ours, but after doing the epoxy I should have slid out our stove. It would have just been much easier to take the tape back off and clean up.
Remove any caulking, I used my 5-in-1 and also a razor blade. I had just replaced our backsplash and installed a new tile so I didn’t need to clean any caulking off for this part because it had already been removed when I did the new backsplash. Remove caulking around your sink, and scrape up anything that is stuck to your countertops.
Next, take your 80 grit or finer sanding pad and lightly scuff/sand your countertops. This is to help the paint adhere better to the countertop. Mine are Formica but if you have any slicker surfaces, you really want to scuff the surface so the paint adheres well.
After sanding, clean the countertops with any kind of countertop cleaner or degreaser. Make sure you clean thoroughly around where you cook and if you eat at your island. After using your cleaner, take a mixture of water & vinegar and wipe back your cleaner. Sometimes cleaners can leave a residue or film and this is just to ensure your countertops are extra clean. I use 50/50 water/vinegar to clean all of my surfaces before painting, it’s my “go to”!

Now that your countertops are super clean, (I hope you sent your husband away so he doesn’t come eat off of them like mine did LOL pray for him!) let’s start taping and prepping for painting!
Tape off between your countertop and your backsplash- if you are going to replace your backsplash you need to rip out the old tile first and wait until AFTER you are done with the epoxy kit to do the backsplash (that’s what I should’ve done).
Apply your Rough Surface Green tape by really pressing in those grooves good. If you have backsplash, leave a small seam between the countertop and the backsplash because you will caulk after the epoxy is all cured. Tape around any edges or where your counter meets the wall. Tape your appliances if you opted to leave them installed.

Next up is painting!!
Grab your liter of Old White and your large foam roller, you can use a roller tray or I just used a large paper plate. Either will work! Your will also need your foam brush or your detail brush for painting in the corners.
When you start, start in the farthest corner or the last place that people look when entering your kitchen. That way you get the hang of what you’re doing by the time you get to the most important part of your countertops like the island or where people tend to hang out.
DON’T FORGET TO PAINT YOUR PRACTICE BOARD TOO WHILE YOU’RE DOING THE BASE COAT.

Work in sections. Brush on in the corners but feather the edges out so there are no harsh lines left or build up paint. After you get the grooves painted, take your large foam roller and start applying the base coat of Old White. You want to apply your first coat in a thinner layer (coverage isn’t the key here) so that the paint has the opportunity to cling to the surface and dry thoroughly.
I allowed my first coat to dry overnight, 6-8 hours before applying my second coat.
You can change out your foam rollers or wrap your roller up in a wet paper towel and wrap a plastic bag tightly over it so air cannot dry the roller out.
Your second coat will give the surface more coverage but don’t worry if it doesn’t fully cover. Your second can also be a thinner coat to allow it to really dry in between. Adding a really heavy coat of paint can make your project messy, dry unevenly, and can do more harm than good when you want to achieve an ultra-smooth surface.
Let your second coat dry well, 1-2 hours or until the paint is room temperature to touch- cold temperature means the paint it still trying to dry underneath…even if it does look and feel dry to the touch.
We will do a third coat to make sure it’s fully covered. Even on my third coat, I had a spot or two where I could barely see the original countertop color but it was very faint. This does not matter so much because we will do stippling and marble all over! So don’t fret if you accidentally make a small chip or small scratch, mine had a couple.
Don’t forget to paint your practice board!

After the third coat, let it dry thoroughly then we will lightly sand with Annie Sloan’s Fine Grit reusable sanding pad. Just doing this will knock down that roller texture and make the countertop feel ultra-smooth. Use a tack cloth to clean up the dust and debris.


After you clean the surface, apply a thin coat of Glossy Lacquer to the counters with your Large Foam Roller. I apply this step because:
- It allows me to work with the marbling more, erasing and reapplying veins without messing with the base coat of Old White.
& 2. Because I have two babies and a husband who eat constantly. So, we needed to be able to use the counters until I could get around to starting the faux marbling. (Family functions were happening while I was doing all this too)

So now that we have our base coat all done, we are ready to start our AWESOME faux marble finish!
Find a picture of marble that you love or want to copy exactly, mine is this one above! Also, you will need to draw out a map of your countertops and sketch where you want to run your veins.

This will help you as you get farther into the process- trust me. Veining is different for all types of marbles, research the look you want. Typically, they can run in a 45 degree, but some are scattered all over too…so research looks.
Let’s start by mixing everything first.
I wanted a warm undertone to my countertops... not a bunch of warmth but just a slight variation in color to add a little more depth. Grab your plastic up to do this color mix. I used color mixture ratio Country Grey 1:3 Old White, then I added about 30-50% water to make the paint opaquer. You can add water as you go, you’ll get the feel for what’s working. You don’t need to mix the whole Country Grey sample, seriously a little bit goes a looong way with Annie Sloan’s Paint!
If you add too much water, add a bit more paint OR you can just stipple over the same area twice…again variations in color are awesome for adding depth and making your marble look natural. Set the mixture aside.
Next, take your Chicago Grey sample and mix about 30-50% water into a plastic cup. Set aside.
Ghost veins: I used French Linen and about 30-50% water. You can apply this directly into a cup or into the sample can like I did. You can mix as you go. Set this aside.
Dark Grey veins: Take another clean plastic cup and pour a little bit of Old White into it, then pour a 3:1 ratio of Graphite into the Old White. Pour the Graphite a little at a time then mix, dumping too much of the black into a lighter color will result in you having to pour way more white back in- AKA wasting lots of paint. So it is best to just mix in a little bit of the dark color at a time until you get the color you need. Set this aside.

If you haven’t cut up your faux finish sponge, do so now… cut pieces to where they are palm sized and have a rounded edge if able.
Grab your marbling map, angle brushes, your fine tip detail brush (synthetic bristles), spray bottle, feather, and lint free towels.
Don’t forget your picture of marble that you will reference to, either print it out or keep it on your phone close to you.
Grab your practice board and start on it first.

Lightly grab some paint out of the Country Grey/Old White mixture with a sponge, don’t soak the sponge. You can off load the paint if you got too much (use a paper plate) and remember
LESS IS MORE. Build up if you need to.
Stipple the sponge onto your practice board, going in a broken “Z” like pattern. Just avoid doing a left to right motion. Leave voided areas that show the base coat, you’re just trying to apply this where you want the main veining to be. Don’t cover the entire surface.
Blend the sponge lines by taking your lint free towel and blotting back. Use the spray bottle and spray a light mist of water over the paint if it has dried already.

Next apply your Chicago Grey water mixture, using a clean sponge and the same stippling technique. Stipple the Chicago Grey where the Country Grey lines are and in the voided areas.
Blend and feather any harsh lines with a lint free towel and mist water if needed.
If you’re stippling is still too bold, you can stipple on some Old White (base coat) and blend in areas that need “less”.

Next is your ghost veins. These veins are very faint but they are what makes your whole faux marble finish look like the real deal! You’ll want to add these in variations of water and paint mixture…meaning some will be lighter (almost gone) and some will be a little bolder.
Hold your fine tip detail brush at the very end of the handle, you want a loose less controlled grasp on the brush.
Start on the edge of your practice board and drag your brush turning it a bit as you drag. Turning it will give a random curve or turn in the vein looking more natural- don’t squiggle the brush.
Veins break randomly, they Y off and sometimes rejoin the main vein, they abruptly stop or fade into the base color, there is no right or wrong way to painting on your veins. Don’t over think it.

Using your angle brush, stipple your veins. Blending them, and fuzzing those edges into the background a bit. Mist water if the paint is too dry. You can leave some veins bolder than others, giving more variations and depth to your masterpiece!

LET’S GET BOLD…next up is the bolder veins.
Start with dipping your feather into the Graphite/Old White Water mixture, and off loading onto your paper plate. Using the same hand placement as you did on the detail brush, drag your feather on your board until you get the desired vein you’re looking for.

Blend your veins with a clean angle brush, and mist water if needed. Remember these veins can also be lighter and darker in some areas.

Check out your practice board, notice what you love and don’t like then adjust. I adjusted the warm tones and did less on the Country Grey mixture, I also noticed my main bolder veins were more “stripey zibra” looking than I wanted so I combined some and made them even bolder.
Now it’s time for the fun part!!! The real deal…you got this!

Start your faux marbling in the farthest or less noticed part of your countertops, then work your way to you’re island last. By then you will have your faux finish perfected and just how you like it.
Don’t forget to continue your marbling over the edges also. Have fun and start some bold veins on the edges too!

It can be a lot by the time you get to your island, so take breaks. Step back a lot and even put the feather down and step away for an hour. By the time I got to my island, my eyes were so tired and it was late…I woke up the next morning with fresh eyes and seen exactly where I needed to adjust and add more ghost veins to help the island blend more together. So take it from someone who does a lot of refinishing, step back and give yourself a break.

After you get all the marbling finished on the countertops, it’s time to start prepping for the epoxy!
Grab your green tape, plastic drop cloths, and brown paper roll.
Use the heavier plastic for the floors, your shoes will get sticky and it’s so annoying if they plastic is thinner and sticks to your shoes with every step. Trust me LOL
Use the lighter plastic for the cabinets, taping on the cabinet right under the countertop.

Tape the plastics to the walls, floors, etc. to hold them down. Use the plastic all over where you think you will walk and over all of your appliances. This stuff is MESSY.

We used the brown paper and taped on the underside of the countertops, avoid going over the edges. We just wanted to make sure nothing leaked too far under the countertops. You will leave the plastic and brown paper on the cabinets for 8+ hours or until the epoxy is no longer dripping.
We started the epoxy at 11am, finished about 2pm and then I didn’t take the plastic and paper off until the next morning. I did remove the floor plastic so we could walk through the kitchen with no issues.
What you’ll need for applying the epoxy:
- Foam Rollers (Giani provided them with our kit)
- Tweezers
- Acetone & paper towel for cleaning
- Epoxy mixture
- Mixing Stick
- Angle Brush (You will throw it away)
- Propane Torch to heat out bubbles
- Plastic scraper or old credit cards
For applying the epoxy, I will link the video here that I followed. As I explained in my video tutorial, ours bubbled really bad so please be sure to watch their steps and read the companies directions as thoroughly as possible. But you also need to read customer reviews, that’s where I fell short and forgot that some had mentioned that you still needed to use a propane torch to get the bubbles out.

I will do a new tutorial over applying the epoxy when I fix the bubbles. I will have to sand them down and re-apply the epoxy (yay…so fuuun) *extreme sarcasm*.
Here are some tips for applying the epoxy:
- Make sure you mix the epoxy for the time given. When you “dump” the epoxy onto the counters be sure to pour it slowly in a small stream to avoid too much bubbles.
- Then you push the epoxy around to fill corners and edges, use your foam brush to get into the edges if your roller can’t do the job. Roll over the edges after you get the flat counter applied, it will fall over the edges.
- The Epoxy we used was self-leveling for 45 minutes to 1 hour, so that’s the time frame we got to work with the epoxy. Try not to overwork it though, pour it on, roll it around where needed then let it do its job.
- Before the self-leveling time-frame is up, pop any bubbles (apply heat if needed), remove any lint with tweezer, and check for any bare patches. If you have a bare patch, apply a little bit of epoxy from your can and stipple your brush a bit to blend.
- We removed the green tape where the epoxy touched the backsplash, sink, wall, etc. after 1-2 hours, if you don’t remove it within the allotted time frame then the epoxy will set up and the tape will be concreted into the epoxy (cured into the finish).

Like I said a thousand times in my video…I absolutely LOVE my countertops! Yes, even with the bubbles LOL
I did not expect them to look this great with the marbling and how the epoxy just made that marble look soooo real. If it wasn’t for the dang bubbles, I swear I’d be dreaming…

I didn’t think a year ago that my kitchen would ever look this good with just some paint and elbow grease but dang, it looks so awesome. I smile every time I walk into my kitchen, my heart is so happy with the bright fun colors and the fresh new look.

I do not regret any of it! I will perfect my epoxy skills and continue to apply this method to my other countertops inside our home (laundry and bathrooms)!

I hope this helps you get started and just take the step towards updating your kitchen, bathroom or whatever room you’ve been itching to start your DIY with! I know it can be scary, the unknown always is but have faith in yourself and your abilities…YOU CAN DO THIS!!
Be sure to follow us along on Instagram and our Facebook pages to see all the transformations we have done and continue to refinish!! Paint is an awesome option for updating your home!! Let us help guide you and inspire you!
Many blessings and happy painting my friends
-Joni Bond