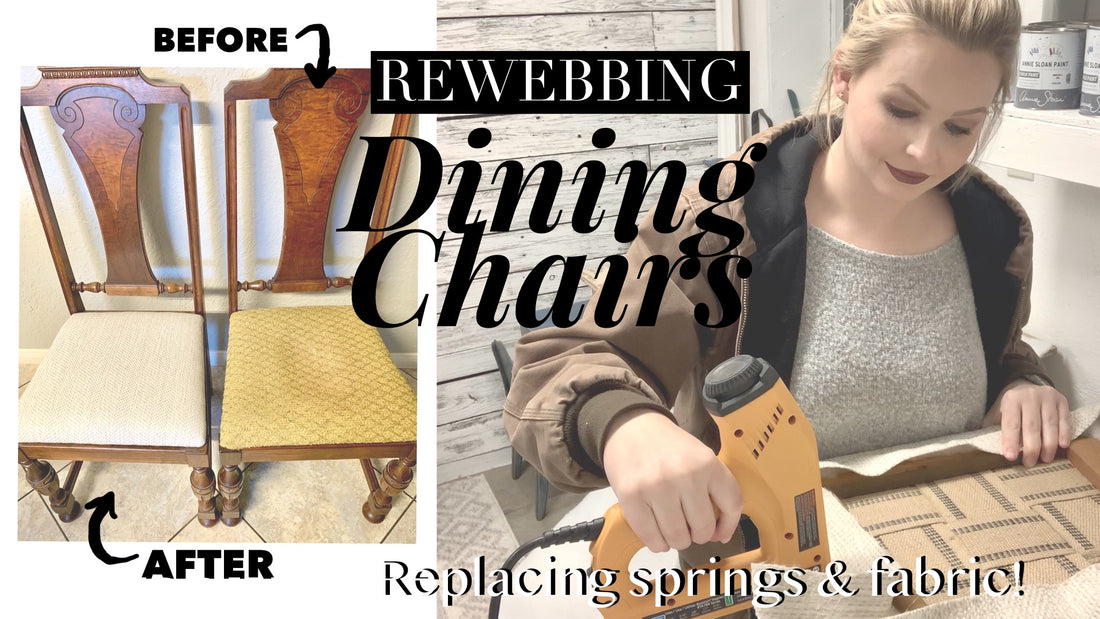
Hey all! I recently got a new GORGEOUS antique dining room table, chairs and matching china cabinet. They are in such great condition and have the most beautiful woodwork. However, the chair seat pads are extremely outdated, dirty, and some of the springs are broken. About 4 out of 8 chairs had broken springs.

Typically, reupholstering chair seats are pretty simple but with these chairs having springs broken and could potentially have more break in the future, I wanted to make sure I didn’t have to fix them again. Instead of replacing springs with more springs, I wanted to go with the webbing method. Webbing, when done correctly, can last many years.
You can watch the full video tutorial here: https://youtu.be/cgED8jdyGXI
Here is the list of products I used:
Removing old fabric:
- Flatheaded screw driver
- Pliers
- Trashcan
- Dust Pan and Hand Broom
Adding webbing and fabric:
- Webbing Stretcher Tool
- Roll of Jute Webbing
- Fabric Scissors or Good Scissors
- Electric Staple Gun
- Staples (I used 12mm ½” staples- be sure they match the same model of staple gun you have)
- Burlap
- Dacryon or Cotton batting
- Foam Pad
- Fabric Adhesive or Hot Glue Gun
- Muslin-can be used instead of dacryon layering.
- Fabric (The one I used)
- Dust Cover
Step 1: Remove your old fabric, I used a flat head screwdriver but it just depends on the piece you have and how it was put together. Pliers come in handy also, along with lots of patients and hand strength. They even have staple remover tools, but they can be pricey and I haven't needed one yet for reupholstering. 
Be sure to keep track of old nails, tacks, or staples. You don’t want to step on these later because some fell in the floor. I usually work right on top of the old fabric while tearing each layer off.

Remove any old springs.

Obviously if your chair doesn’t have springs, you can skip removing the springs or if it’s just a solid wood seat pad skip to step 5- just be sure to clean your area from the old dirty fabric.
Step 2: Clean your area, throw any old fabric and tacks in the trash.
Step 3: Add webbing. Use your staple gun to attach the strip of webbing (leave excess to fold over and staple again). Use your webbing tool to stretch the webbing tight and secure with staples. Cut the end of the webbing once you get it properly stretched tight.


Depending on how large your chair is, you will add multiple strips of webbing vertically. Then alternate the webbing horizontally, weaving it in and out the vertical strips.

Fold the excess webbing on top of your existing staples and staple again for extra measure.

Step 4: Add a layer of burlap to the top of the webbing. You can secure one side then hand tighten the burlap, stapling the bottom. Staple a full square around the webbing.
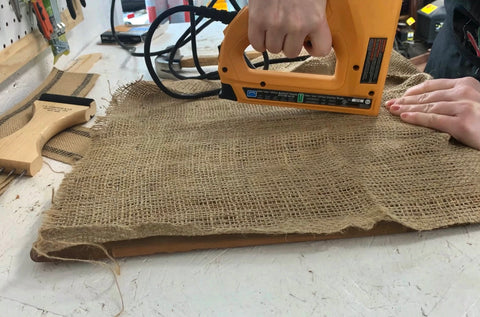
This is to help fill the holes between the webbing. When people sit in the chair, the webbing will naturally stretch. When this happens your foam can fall into the small holes creating little dimples in your seat overtime, the burlap helps prevent this.
Take your excess burlap, fold over existing staples and staple again for extra hold.

Step 5: Add a little pad of cotton or dacryon to the center, this helps fill that little air pocket you get when you sit down on the foam pad.

Step 6: Grab your foam pad and line it up on the seat pad. Mark off where you have overhang then cut off any excess foam.

Once your foam pad properly fits the seat pad, attach it with glue. 3M fabric glue works, but you can also use hot glue, or any fabric adhesive you have on hand. This helps to keep the foam pad from shifting as you work and over time.

Step 7: Optional- depends on your main fabric type (thickness, color, and pattern).
Because I had a white linen and the foam didn’t quite cover the sides of the wood seat pad, I wanted that extra padding around the edges so I added a layer of dacryon. Another option is muslin fabric, depending on the color and thickness of your fabric.
Before cutting your dacryon, make sure you have excess material to stretch and staple on the backside.

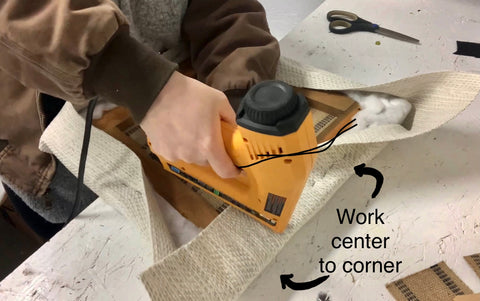
Step 8: Staple one side of the dacryon fabric to the backing of the seat pad, stretch the opposite side and attach it also. Working from the center to the corners, stretch and staple. You can also lightly knead the dacryon fabric up to stretch.

Step 9: Once all sides are stapled, fold the corners in avoiding any creases or bulging on the sides of the chair (the sides will show wrinkles if not).


TIP: Be sure to avoid covering the screw holes that attach the seat pad to the chair. You want to leave them open so its easy to attach in the screws.

Step 10: Grab your final layer of fabric! Sweet Jesus, it will probably seem like it takes forever to get to this point but the end result is well worth it!

Make sure your fabric pattern is correctly placed and matches any other chairs you have already done. Do not cut the fabric until you know you have enough excess to stretch and staple the fabric down (just like the dacryon).
Take one side of the pad and attach the fabric with 2-3 staples in the center. Now take the opposite edge and stretch the fabric (while also kneading the fabric pad on the top side-view picture). Secure the opposite edge with 2-3 staples.

Work from the center to the corner, stretching the fabric and kneading it. You knead the fabric and work in small sections to avoid bumps or nipples on the sides of the seat pad. If you don’t properly stretch the fabric, you can form a bumpy side; which doesn’t look good when finished.

Work slowly and correct yourself if you notice you didn’t get an area properly stretched and a bump has formed.
Do not do the corners until you are completely done attaching all 4 sides.
Step 11: Once you get all 4 sides attached, you can start working on the corners. Same as the dacryon step, you want to make sure no creases or folds are showing on the side of the seat pad.

Knead, stretch, and fold. Staple down corners. Be sure to avoid the screw holes by trimming up excess fabric and securing any loose fabric back.

Step 12: Add your dust over! This is optional or you can use any kind of cheap fabric to cover the underside. Fold the dust cover edges for a clean edge, cover the fabric staples, and attach with a couple of staples. You can hand stretch this part; it doesn’t need to be super tight like the fabric.

Once each side is secure, fold the corner and attach with staple.
Step 13: Grab your chair and attach your seat pad!

Sit back (literally take a seat) and enjoy your hard work! You just saved lots of $$$ and also made it all on your own.
I hope this DIY post assists you in reupholstering any chair pad in the future! Saving you some money but also how easy it can be when you get all your supplies gathered. Please leave any comments below, I’d love to hear if you use the same method or have improvements to my steps!
